
Subscribe to our YouTube Channel for more latest updates
_edited.png)
Item List

खट्टे चावल के पापड़ रेसिपी | Steamed Rice Papad Without Soda | Crispy Chawal Papad
अगर आपके चावल के पापड़ सूखने के बाद फट जाते हैं या ठीक से नहीं फूलते, तो यह Rice Papad की खास रेसिपी आपके लिए है। इस विधि में पापड़ बिना सोडा और बिना पापड़ खार के बनते हैं, बहुत पतले और ट्रांसपेरेंट बनते हैं और तलते ही अपने साइज के डबल-ट्रिपल फूल जाते हैं। यह खट्टे चावल के पापड़ स्टीम से बनते हैं इसलिए कम तेल में भी परफेक्ट बनते हैं और लंबे समय तक स्टोर किए जा सकते हैं। पतले, ट्रांसपेरेंट और कुरकुरे Rice Papad — स्टीम से बने, बिना सोडा और बिना पापड़ खार। 🧂 सामग्री (Ingredients) चावल – 2 कप पानी – आवश्यकता अनुसार नमक – स्वादानुसार चिली फ्लेक्स – 1 छोटा चम्मच (ऑप्शनल) जीरा – ½ छोटा चम्मच (ऑप्शनल) तेल – थोड़ा सा (ग्रीस करने के लिए) 👩🍳 बनाने की विधि (Rice Papad) Step 1: चावल भिगोना चावल को अच्छे से धोकर 24 घंटे भिगो दें।👉 ज्यादा समय भिगोने से पापड़ नहीं टूटते। Step 2: बैटर बनाना भीगे चावल मिक्सर में डालकर बराबर पानी डालते हुए स्मूद बैटर बना लें। Step 3: फर्मेंट करना (खट्टे पापड़ के लिए) बैटर को 8–10 घंटे ढककर रखें जब तक हल्का फूल न जाए (इडली बैटर जैसी कंसिस्टेंसी)। Step 4: मसाले मिलाएं नमक, जीरा और चिली फ्लेक्स डालकर अच्छी तरह मिक्स करें। Step 5: स्टीम से पापड़ बनाना स्टील की कटोरी / ढक्कन को हल्का ग्रीस करें।एक चम्मच बैटर डालकर पतला फैलाएं और स्टीमर में 30–40 सेकंड पकाएं। Step 6: पापड़ निकालना हल्का ठंडा होने पर चम्मच से किनारा छोड़ें — पापड़ अपने आप निकल जाएगा। Step 7: सुखाना पापड़ को प्लास्टिक शीट / कपड़े पर फैलाकर पंखे की हवा में 1 दिन सुखाएं।👉 धूप हो तो 1 घंटे धूप जरूर दिखाएं (स्टोरेज के लिए)। 🍳 तलने का तरीका गरम तेल में डालते ही Rice Papad अपने साइज के डबल-ट्रिपल फूल जाते हैं और बहुत कुरकुरे बनते हैं। ⭐ Recipe Benefits ✔ बिना सोडा, बिना पापड़ खार ✔ स्टीम से बने — कम तेल में परफेक्ट ✔ पतले और ट्रांसपेरेंट पापड़ ✔ सूखने के बाद नहीं फटते ✔ लंबे समय तक स्टोर 💡 Tips चावल ज्यादा समय भिगोएं → पापड़ नहीं टूटेंगे बैटर हल्का फर्मेंट होना चाहिए ढक्कन एक बार ग्रीस करें → बार-बार तेल की जरूरत नहीं पापड़ को सुखाते समय पलटें नहीं स्टोर करने से पहले धूप दिखाएं #ricepapad #chawalkepapad #papadrecipe #homemadepapad #crispyfood #indiansnacks #traditionalrecipe #snackrecipe #easyrecipe #papadmaking #foodzlife #viralrecipe #kitchenhacks #festivalfood #trendingrecipe बिना सोडा और बिना पापड़ खार के बनाएं पतले, ट्रांसपेरेंट और कुरकुरे Rice Papad — स्टीम से बने पापड़ जो तलते ही डबल-ट्रिपल फूलते हैं और सूखने के बाद कभी नहीं फटते

Mustard Sauce Recipe|कॉन्टिनेंटल फूड का स्वाद बढ़ा देती है मस्टर्ड सॉस, जाने इसके फायदे और रेसिपी | Rai Ki chutney | kasundi
Mustard Sauce Recipe अमेरिकन सॉस मार्केट में काफी महंगे दामों में मिलती है लेकिन इसे आप घर पर बड़ी ही आसानी से बना सकते हैं और बहुत ही सस्ते में | काफी सारी चीजों में इसका इस्तेमाल होता है इसे एज अ डिप या फिर ड्रेसिंग में या फिर मैरिनेट में इस्तेमाल किया जाता है,इसे आप सर्व कर सकते हैं आलू के पराठे या फिर किसी भी स्टफ पराठा कचौरी , समोसे , पकौड़े के साथ और सबसे खास बात इस चटनी की कि इसे आप लॉन्ग टाइम तक स्टोर करके भी रख सकते हैं | Mustard Sauce Recipe Mustard Sauce Recipe पोषक तत्वों से भरपूर सरसों के बीज में कैल्शियम, आयरन, पोटेशियम और विटामिन प्रचुर मात्रा में पाए जाते हैं। इसमें मौजूद सेलेनियम और मैग्नीशियम की मात्रा से शरीर हृदय रोगों से दूर रहता हैं। साथ ही शरीर की रोग प्रतिरोधक क्षमता भी मज़बूत बनी रहती है। सरसों के बीज से तैयार मस्टर्ड सॉस स्वाद के साथ सेहत भी प्रदान करती है। बाज़ार में उपलब्ध मस्टर्ड सॉस में प्रिजर्वेटिव्स को मिलाया जाता है। मगर घर आप नपे तुले ढ़ग से मसालों का इस्तेमाल करके अपने स्वाद के मुताबिक इसे तैयार कर सकते हैं। जानते हैं सरसों के बीज के कुछ अन्य फायदे और सॉस तैयार करने की विधि भी। सरसों के बीज के फायदे Mustard Sauce Recipe 1. एंटीऑक्सीडेंटस का रिच सोर्स सरसों के बीज में कैरोटीनॉयड,आइसोरहमनेटिन और केम्पफेरोल समेत एंटीऑसीडेंटस पाए जाते है। इन फ्लैवोनोइड एंटीऑक्सिडेंट्स की मदद से शरीर में टाइप 2 डायबिटीज़, हार्ट संबधी समस्याएं और कैंसर सेल्स की रोकथाम करने में भी मददगार साबित होते हैं। इसके अलावा सरसों के बीज में एंटी इंफ्लामेटरी, एंटी बैक्टीरियल और एंटी फंगल गुण भी पाए जाते हैं। 2. स्किन संबधी समस्याओं को करे हल एंटी इंफ्लामेटरी गुणों से भरपूर सरसों के बीज का सेवन करने से स्किन संबधी समस्याएं दूर होने लगती है। शरीर में बढ़ने वाली सूजन को कम करने में मदद मिलती है। इससे सोरायसिस के लक्षणों को दूर किया जा सकता है। इसके अलावा डर्माटाइटिस की परेशानी भी हल हो जाती है। 3. ब्लड शुगर लेवल को करें नियंत्रित खून में ग्लूकोज़ का बढ़ता स्तर नियंत्रित करने के लिए सरसों के बीज का सेवन करें। फिलिपीन काउंसिल ऑफ हेल्थ रिसर्च के अनुसार सरसों के पत्तों का काढ़ा बनाकर पीने से टाइप 2 शुगर को रिवर्स किया जा सकता है। 4. गुड कोलेस्ट्रॉल को बढ़ाए यूरोपियन फेडरेशन ऑफ फूड सांइस एंड टेकनोलॉजी के एक रिसर्च के अनुसार मस्टर्ड सीड्स के सेवन से शरीर में वसा को घटाया जा सकता है। 40 से 70 की उम्र के 42 लोगों पर किए गए रिसर्च के मुताबिक उन्हें 12 सप्ताह तक मसटर्ड सीड्स दिए गए। इनमें से 64 फीसदी लोगों के कोलेस्ट्रॉल में गिरावट दर्ज की गई और शरीर में गुड कोलेस्ट्रॉल बढ़ा हुआ पाया गया। जानते हैं पोषक तत्वों से भरपूर मस्टर्ड सॉस को बनाने की रेसिपी | आवश्यक सामग्री Mustard Sauce Recipe छह बड़े चम्मच येलो मस्टर्ड ( पीली सरसों ) दो बड़े चम्मच ब्लैक वाली मीडियम साइज की मस्टर्ड ( राई ) 2 इंच अदरक के टुकड़े 10 कलियां लहसुन चार हरी मिर्च नमक सवा छोटा चम्मच या फिर स्वादानुसार आधा कप पानी एक छोटी चम्मच शुगर (चीनी) 1/4 कप यानी कि चार बड़े चम्मच वाइट विनेगर (सफ़ेद सिरका ) आधी छोटी चम्मच हल्दी पाउडर 1 चौथाई कप मस्टर्ड ऑयल (कच्चा सरसों का तेल ) बनाने की विधि स्टेप 1 छह बड़े चम्मच पीली सरसों, दो बड़े चम्मच राई (काली सरसों ) को अच्छे से कपड़े में पोछकर साफ कर ले, उसके बाद मिक्सर जार के अंदर पल्स मूड पर ग्राइंड करे | एक सेकंड चलाए रुक जाए चलाए रुक जाए यदि आपने लगातार मिक्सी को चला दिया तो ऑयल रिलीज हो जाएगा | दो तरीके की मस्टर्ड स्टेप 2 2 इंच अदरक के टुकड़े को धोकर छीलकर सुखाकर ,10 कलियां लहसुन की, चार हरी मिर्च को काट कर, सवा छोटा चम्मच नमक, आधा कप पानी को पकाकर ठंडा करके,एक छोटी चम्मच शुगर मिलाकर पीस ले | तैयार है येलो मस्टर्ड सॉस स्टेप 3 मस्टर्ड सॉस को लॉन्ग टाइम तक स्टोर करने के लिए चार बड़े चमच वाइट विनेगर( सिरका )मिलाये| आधी छोटी चम्मच हल्दी पाउडर मिलाये अगर कमर्शियल यूज के लिए बना रहे हैं तो इसके अंदर येलो फूड कलर भी इस्तेमाल कर सकते हैं |अब इसे भी ब्लेंड कर लें ताकि सभी चीजें अच्छे से मिक्स हो जाए |एक चौथाई कप कच्चा सरसों का तेल मिलाये | सॉस के अंदर तेल ऐड कर देने के बाद एक बार और मिक्सी चला लें ताकि सभी चीजें अच्छे से मिक्स हो जाएं | लीजिए तैयार है येलो मस्टर्ड सॉस बहुत ही इजी तरीके से और एकदम सेम टेस्ट आएगा जैसा कि आप मार्केट से महंगे दामों में लेकर आते हैं यह येलो मस्टर्ड सॉस आप एक बार इस तरीके से जरूर बनाकर देखिए | #mustardsauce #yellowmustardsauce #chutney #americanmustardsauce #sauce #saucerecipe #saucerecipes #pilisarsonkichutney #foodzlife

"How to Make Delicious Veg Manchurian - A Step-By-Step Guide"
#Manchurian #VegManchurianRecipe #ManchurianGravy #IndoChineseResepe Veg Manchurian : मंचूरियन एक इंडो - चायनीज़ व्यंजन है जिसे तले हुए चावल या नूडल्स के कॉम्बिनेशन के साथ परोसा जा सकता है , ये स्वादिष्ट होने के साथ ही पौष्टिक भी होता है क्योंकि इसमें बहुत सारी सब्जियाँ और सॉस शामिल होता है जो इसे आकर्षक और टेस्टी बनाता है | मंचूरियन वेज और नोनवेज दोनों तरीके से बनाया जा सकता है , वेज मंचूरियन मुख्य रूप से पत्ता गोभी , फूलगोभी , पनीर से बनाया जाता है जबकि नोनवेज मंचूरियन मुख्य रूप से चिकन , मटन , मछली , झींगा से बनाया जाता है | नमस्कार दोस्तों, हमारी वेबसाइट www. foodzlife.com में आपका स्वागत है, मैं उमा रावत हूं, इस पोस्ट में मैं आपको आपके मेहमानों और परिवार के लिए उत्तम और रेस्तरां गुणवत्ता वाले वेज मंचूरियन रेसिपी बनाने के टिप्स बताऊंगी । वेज मंचूरियन रेसिपी एक स्वादिष्ट और सबसे लोकप्रिय भारतीय चीनी रेसिपी में से एक है जो पत्तागोभी से बनाई जाती है। Preparation and cooking time: 40 Minute Servings~ 3 to 4 सामग्री Ingredients for veg manchurian For gravy- *1 tbsp ginger garlic paste/अदरख लहसुन का पेस्ट *2 green chillies/हरी मिर्च *1/2 cup bell pepper/शिमला मिर्च *1 onion/प्याज़ *2 tbsp of carrot/गाजर * black pepper corn powder/काली मिर्च का पाउडर *2 tbsp ararot or corn flour/अरारोट *2 tbsp tomato sauce/टमाटर सॉस *1 tbsp red chilli sauce/लाल तीखी सॉस *1 tbsp green chilli sauce /हरी तीखी सॉस *1.5 glass of water/पानी *2 tbsp dark soya sauce/सोया सॉस *salt/नमक *spring onion green/हरा प्याज़ For manchurian balls- *1/2 cabbage/पत्तागोभी *1 carrot/गाजर *2 green chilli/हरी मिर्च *15-20 garlic cloves/लहसुन *1tsp chopped ginger/अदरख *garam masala/गरम मसाला *1 tsp kashmirir red chilli powder/ कश्मीरी लाल मिर्च पाउडर *2.5 tbsp all purpose flour/मैदा *2.5 tbsp corn flour/कॉर्न फ्लोर/अरारोट *1 tsp soya sauce /सोया सॉस *salt as per taste/नमक *oil for deep frying/तेल तलने के लिए बनाने की विधि - Method for veg manchurian शिमला मिर्च को छोटे टुकड़ो में काट ले पत्ता गोभी को चाकू , मिनी चॉपर या मिक्सर ग्राइंडर किसी की भी मदद से बारीक काट ले बारीक कटे हुए पत्ता गोभी में थोड़ा नमक मिलाकर थोड़ी देर रख दे फिर किसी बारीक कपडे से उसका पानी निचोड़ ले बारीक कटे हुए पत्ता गोभी में 1 छोटा चम्मच अदरख लहसुन का पेस्ट, एक चौथाई छोटा चम्मच गरम मसाला पाउडर , 1 tsp कश्मीरी लाल मिर्च पाउडर, 2 tbsp of carrot/गाजर (Choped ), एक छोटा चम्मच सोया सॉस मिला देंगे बाइडिंग के लिए २ चम्मच मैदा और 2 चम्मच अरारोट या कॉर्नफ्लोर मिलाकर हल्के हाथों से मिला लेंगे , अब स्वाद के अनुसार नमक मिलाकर हल्के हाँथो से मिक्स कर ले ताकि पानी रिलीज़ न हो डो तैयार करे ,उसके छोटे - छोटे बोल्स बना ले एक कडाही में तेल मध्यम गरम करे और मध्यम आंच पर हाफ कुक करने के बाद बॉल्स बाहर निकाल ले 5 से 10 मिनट के लिए ठंडा होने दे | ग्रेवी में इस्तेमाल करने के लिए घोल तैयार करे 2 चम्मच अरारोट लेकर पानी मिलाकर पतला घोल तैयार कर ले | तेल को तेज गरम करे मंचूरियन बॉल्स को दुबारा तेज आंच पर गोल्डन ब्राउन होने तक तले , जब बॉल्स अच्छे से तल जाएंगे फिर ये तेल के ऊपर तैरने लगेंगे ये पहचान है कि बॉल्स परफेक्ट तैयार हो गए है | ग्रेवी तैयार करे , ग्रेवी तैयार करने के लिए एक कड़ाही में 2 चम्मच आयल गरम करे , फिर चॉप किये हुए लहसुन और अदरक को डाले जिससे इनका कच्चापन निकल जाए इसके बाद प्याज , गाजर और हरी मिर्च को डालकर 1 मिनट भून ले , सारी शिमला मिर्च डालकर 1 मिनट भूने , टोमेटो सॉस डालें , चिली सॉस , चिली सॉस , सोया सॉस , कालीमिर्च पाउडर , नमक डालकर अच्छे से मिक्स करे अगर ग्रेवी वाला मंचूरियन बनाना है तो डेढ़ गिलास पानी मिलाये और अगर ड्राई मंचूरियन बनाना है तो एक गिलास पानी मिलाएं | एक उबाल आने के बाद अरारोट का घोल धीरे - धीरे मिलाएं , सारे मंचूरियन बॉल्स डालकर 5 मिनट के लिए पकाएं | स्वाद के अनुसार नमक और कटा हुआ हरा प्याज मिलाकर गरमागरम परोसें | इसे हक्का नूडल्स या फ्राइड राइस के साथ खाने में परोसिये या फिर ऐसे ही इस गरमागरम मसालेदार रेसिपी का आनंद लीजिये | आप इस रेसिपी का वीडियो हमारे यूट्यूब चैनल foodzlife पर देख सकते है -

"Mango Murabba Recipe: आम का मुरब्बा बनाने की गारंटीड विधि"
"आम का मुरब्बा (Mango Murabba) बनाने की आसान और गारंटीड विधि! इस तरह बनाएंगे तो कभी खराब नहीं होगा। स्वादिष्ट और सेहतमंद मुरब्बा बनाने के लिए फॉलो करें यह स्टेप-बाय-स्टेप रेसिपी।" घर पर तैयार किए गए स्वादिष्ट आम के मुरब्बे की मिठास, जो आपकी चटपटी यादों को ताजा कर देगी। आम का मुरब्बा बनाने के लिए आवश्यक सामग्री (Mango Murabba Ingredients) मुख्य सामग्री: 700 ग्राम कच्चे आम (कच्चे व हरे, मीडियम साइज के) 600 ग्राम चीनी (आम के वजन के अनुसार) मसाले व फ्लेवरिंग: 3 इलायची (हल्का कूट लें) 3 लौंग 1 इंच दालचीनी का टुकड़ा 15-20 धागे केसर (दूध में भिगोकर) 1 चुटकी नमक (स्वादानुसार) प्रिजर्वेटिव/एसिडिटी बैलेंसर: 1 चम्मच नींबू का रस (या 1/4 छोटा चम्मच साइट्रिक एसिड) विशेष नोट्स (Tips for Best Results): ✅ आम का चयन: कच्चे, सख्त व बीज वाले आम लें (जैसे तोतापरी या रॉ मैंगो)।✅ चीनी अनुपात: आम के वजन का ~85% चीनी (700g आम = ~600g चीनी)।✅ नींबू रस का महत्व: मुरब्बा खराब होने से बचाता है और रंग निखारता है।✅ केसर का विकल्प: यदि न हो तो 1/2 चम्मच केसर पाउडर भी इस्तेमाल कर सकते हैं। Mango Murabba बनाने की विधि (Step-by-Step Recipe) स्टेप 1: आम की तैयारी आम धोना व छीलना: ताजे कच्चे आम (700g) को अच्छी तरह धोकर सुखा लें। छीलकर लंबी फाँकों में काटें (या छोटे पीस भी कर सकते हैं)। बीज निकालकर चाकू से अतिरिक्त पल्प हटा दें। ब्लांचिंग (वैकल्पिक, पर फायदेमंद): एक बर्तन में आम की फाँकें डालें। गर्म पानी (या हल्का उबालकर 5 मिनट तक ब्लांच करें) – इससे आम नरम होंगे और मुरब्बा जल्दी तैयार होगा। पानी निकालकर आम फाँकें अलग रख दें। ताज़े कच्चे आम जो मुरब्बा बनाने के लिए तैयार हैं। Aam ko cheel aur kaat le प्लेट में रखे हुए आम के लंबे-लंबे कटे हुए टुकड़े। Mango Murabba Recipe - Step 2 (Detailed Instructions) Step 2: आम को शुगर के साथ मिलाना और मैकरेट करना आम की सॉफ्टनेस चेक करें 5 मिनट ब्लांचिंग के बाद आम के टुकड़ों को चेक करें वे हल्के नरम होने चाहिए (पूरी तरह गले नहीं) अगर ज्यादा कच्चे हैं तो 2-3 मिनट और उबालें पानी निकालें आम को जाली छन्नी में निकाल लें एक्स्ट्रा पानी पूरी तरह निकल जाने दें किसी सूखे बाउल में ट्रांसफर करें चीनी मिलाएं 700g आम के लिए 600g चीनी (लगभग 3 कप) डालें चीनी को आम के टुकड़ों पर समान रूप से फैला दें हल्के हाथों से मिलाएं (ज्यादा मिक्स न करें) मैकरेशन के लिए छोड़ दें कटोरे को ढककर रखें 1-2 घंटे के लिए छोड़ दें इस दौरान चीनी पूरी तरह मेल्ट हो जाएगी आम से नेचुरल जूस निकलकर चाशनी बना लेगा गाढ़ा और सुनहरा आम का मुरब्बा कढ़ाई में चम्मच से परोसा जा रहा है, जो मिठास और सुस्वादुता से भरपूर है। Mango Murabba Recipe - Step 3 (Pressure Cooker Method) स्टेप 3: प्रेशर कुकर में मुरब्बा पकाना मसाले डालें: आम-चीनी मिश्रण में डालें: 3 इलायची (खोलकर) 3 लौंग 1 इंच दालचीनी 15-20 धागे केसर (रंग और खुशबू के लिए) 1 चुटकी नमक (मिठास बैलेंस करने के लिए) प्रेशर कुकर में पकाएं: मिश्रण को प्रेशर कुकर में डालें। बिना पानी डाले (क्योंकि आम अपना जूस छोड़ चुके हैं)। 5-6 सीटी आने तक मध्यम आंच पर पकाएं। बीच-बीच में कुकर को हिला दें (जले नहीं इसलिए)। चाशनी की कंसिस्टेंसी चेक करें: प्रेशर रिलीज करके देखें: आम ट्रांसलूसेंट (पारदर्शी) हो गए हों। चाशनी थ्रेड कंसिस्टेंसी (उंगली से चिपके और धागा बने) में हो। प्रिजर्वेटिव ऐड करें: 1 चम्मच नींबू का रस (या 1/4 छोटा चम्मच साइट्रिक एसिड) मिलाएं। यह मुरब्बा को लंबे समय तक खराब होने से बचाता है। स्टोर करने का तरीका मुरब्बा पूरी तरह ठंडा होने दें। एयरटाइट ग्लास जार में भरकर रखें। स्टोरेज ऑप्शन्स: रूम टेंपरेचर: 1 साल तक (सूखी जगह पर)। फ्रिज में: 2 साल तक फ्रेश रहेगा। सर्विंग आइडियाज़ 🥭 पराठे/पूरी के साथ मीठे के रूप में। दही या रायता में मिलाकर। बच्चों को कैंडी की तरह खिलाएं। गर्मियों में शर्बत बनाकर पिएं। टिप: अगर चाशनी पतली है तो 2-3 दिन धूप में रखें – गाढ़ा हो जाएगा! इस तरह बनाया गया मुरब्बा बिल्कुल परफेक्ट और लंबे समय तक चलने वाला होगा! 🌟 #AamKaMurabba #MangoMurabba #PressureCookerRecipe #HomemadeMurabba #IndianSweets #SummerSpecial #GrandmasRecipe #NoPreservatives #TraditionalIndianFood #FoodieIndia #HealthySweets #AyurvedicRecipe

"आम का सूखा अचार बनाने का आसान तरीका - Dry Mango Pickle at Home (वीडियो के साथ)"
"सीखिए घर पर आम का सूखा अचार बनाने का आसान तरीका! यह कम तेल वाली हेल्दी रेसिपी मानसून में भी 1 साल तक खराब नहीं होती। स्टेप बाय स्टेप फोटो गाइड और वीडियो के साथ। जानिए दादी के 3 सीक्रेट टिप्स जो इस अचार को खास बनाते हैं - क्रंची टेक्स्चर और टेंगी-स्वीट फ्लेवर गारंटीड!" "क्या आप जानते हैं भारत में 90% घरों में अचार का एक जार जरूर मिलता है? पर आज हम जिस सूखे आम के अचार की बात कर रहे हैं, वो सिर्फ स्वाद ही नहीं बल्कि सेहत का भी खजाना है! ✨ यह क्रंची टेक्स्चर वाला अचार:✅ बिना रिस्क के टिफिन/यात्रा में ले जा सकते हैं✅ अन्य अचारों से 3 गुना ज्यादा समय तक चलता है✅ बच्चों से लेकर बुजुर्गों तक सबकी पसंद बनेगा आज मैं आपको सिखाऊंगी मेरी दादी के वो 3 गुप्त टिप्स जो इस अचार को: बाजार वाले अचार से अलग बनाते हैं पाचन तंत्र के लिए फायदेमंद हैं बनाने में सिर्फ 25 मिनट लगते हैं!" कच्चे आम के मसालेदार अचार की रेसिपी का आनंद लें - स्वाद और मसालों का अनोखा संगम। सूखा आम का अचार - सामग्री (विस्तृत वर्जन) मुख्य सामग्री:✔️ 1 किलो कच्चा आम (कड़क हरे आम, धोकर सुखाएं)✔️ ½ कप सरसों का तेल (कोल्ड प्रेस्ड, शुद्ध) मसाले (Dry Roast करने के लिए):🔥 2 बड़े चम्मच मेथी दाना (कड़वाहट दूर करने के लिए हल्का भूनें)🔥 ½ कप पीली सरसों (कुरकुरेपन के लिए)🔥 ½ कप धनिया बीज (गोल्डन ब्राउन होने तक)🔥 2 बड़े चम्मच जीरा (सुगंध निकलने तक) विशेष मसाले:✨ 3 बड़े चम्मच सौंफ (माउथ फ्रेशनर की तरह काम करेगी)✨ 2 बड़े चम्मच कलौंजी (पाचन में मददगार) पाउडर मसाले: 🧂 1 बड़ा चम्मच हल्दी (प्रिजर्वेटिव + रंग के लिए)🌶️ 1 चम्मच लाल मिर्च पाउडर (स्वादानुसार समायोजित करें)⚫ 2 बड़े चम्मच काला नमक (स्मोकी फ्लेवर के लिए)⚪ 3 बड़े चम्मच सफेद नमक (प्रिजर्वेशन हेतु) तरल पदार्थ:💧 ½ कप सिरका (सेब का सिरका बेस्ट, खटास बैलेंस करे) सूखा आम का अचार - बनाने की विधि (विशेष टिप्स के साथ) स्टेप 1: आम की तैयारी (गोल्डन रूल्स) आम का चयन 1 किलो कच्चे हरे आम चुनें (दबाने पर कड़क, बिना दाग वाले) प्रो टिप: केरल का नीलम या उत्तर भारत का लंगड़ा आम सर्वोत्तम धोने का सही तरीका आमों को ठंडे पानी में 5 मिनट भिगोएं नरम ब्रश से साफ करें (किसी भी रेजिन को हटाएं) सावधानी: डंठल न तोड़ें (धुलाई के बाद हटाएं) काटने की विधि आम को 3 भागों में काटें: गुठली वाला मध्य भाग (अलग करें) बाहरी गूदा 2-3 इंच लंबाई में या 1x1 इंच क्यूब्स में (समान आकार जरूरी) विशेष निर्देश: काटते समय हाथ और बोर्ड सूखे होने चाहिए सुखाने की प्रक्रिया कटे आम को कॉटन कपड़े पर फैलाएं 2 घंटे पंखे के नीचे या 1 घंटा धूप में (ज्यादा नहीं, नमी पूरी तरह न जाए) टेस्ट: टुकड़े चिपचिपे नहीं, थोड़े खुरदुरे होने चाहिए ⚠️ अतिरिक्त सावधानियाँ: कभी भी गीले हाथों से आम न छुएं धूप में ज्यादा देर न रखें (आम सख्त हो जाएगा) कटे आम को तुरंत एयरटाइट कंटेनर में रखें (धूल से बचाव) 🎥 वीडियो टिप:काटने का तरीका हमारे वीडियो के 1:15 मिनट पर देखें - कैसे बिना गूदा बर्बाद किए आदर्श टुकड़े करें! कटे हुए आम के टुकड़े एक हाथ में पकड़े गए, बैकग्राउंड में कटे आम का कटोरा। स्टेप 2: मैरिनेशन प्रोसेस (विज्ञान-आधारित तकनीक) 1. नमक और हल्दी का उपयोग 2 बड़े चम्मच सफेद नमक (समुद्री नमक बेहतर) विज्ञान: नमक आम से अतिरिक्त नमी निकालता है और प्रिजर्वेटिव का काम करता है 1 बड़ा चम्मच हल्दी पाउडर (ऑर्गेनिक) फायदा: प्राकृतिक एंटीबैक्टीरियल + चमकदार पीला रंग 2. मिक्सिंग तकनीक कंटेनर को 5 मिनट तक हिलाएं (हाथों से या ढक्कन लगाकर शेक करें) प्रो टिप: स्टेनलेस स्टील/ग्लास जार का उपयोग करें (प्लास्टिक से बचें) 3. सन-ड्राइंग प्रक्रिया समय: 48 घंटे (2 पूरे दिन) आदर्श स्थान: सुबह 8-11 बजे की धूप दोपहर में छाया में रखें (तेज धूप आम को सख्त बना सकती है) जाँच: दूसरे दिन आम के टुकड़े 30% सिकुड़े हुए दिखने चाहिए ⚠️ महत्वपूर्ण निर्देश: ढक्कन भूलकर भी न खोलें (हवा लगने से फफूंद लग सकती है) रात में जार को अंदर ले आएं (नमी से बचाव) अगर कंटेनर में पानी जमा हो तो: तुरंत आम निकालें नया सूखा कंटेनर यूज़ करें 1 चम्मच अतिरिक्त नमक डालें 🎥 वीडियो टिप: हमारे वीडियो में 2:10 मिनट पर देखें - कैसे पहचाने कि आम सही तरीके से मैरिनेट हो रहा है? (आदर्श बनावट के संकेत) कच्चे आम को मसालों के साथ मिलाकर अचार के लिए जार में रखा गया है। स्टेप 3: आम की नमी कंट्रोल करने की विशेषज्ञ तकनीक 1. मैरिनेशन के बाद की प्रक्रिया ✅ 2 दिन बाद जार खोलें – अब आम: 30-40% सिकुड़े हुए दिखेंगे गहरे पीले-हरे रंग के हो जाएंगे खट्टी-मीठी खुशबू आएगी ⚠️ ध्यान दें: मैरिनेशन वाला पानी फेंक दें (इसमें कड़वाहट होती है) चम्मच सूखा हो (नमी से फफूंद लग सकती है) 2. धूप में सुखाने का सही तरीका ⏳ समय: 1 घंटा (ज्यादा नहीं!)🌞 तकनीक: आम के टुकड़ों को सूती कपड़े/बाँस की ट्रे पर फैलाएं सुबह 8-10 बजे की हल्की धूप में रखें हर 15 मिनट में पलटें (समान सुखावट के लिए) 🔍 परफेक्ट ड्राइनेस चेक: आम चिपचिपा नहीं, बल्कि खुरदुरा लगे दबाने पर थोड़ा स्प्रिंगी महसूस हो (ज्यादा सख्त नहीं) 3. कॉमन मिस्टेक्स से बचें ❌ ज्यादा धूप में न रखें – आम रबड़ जैसा सख्त हो जाएगा❌ प्लास्टिक/मेटल ट्रे न उपयोग करें – गर्मी से चिपक सकता है❌ छाया में न सुखाएं – नमी पूरी तरह नहीं निकलेगी 💡 प्रो टिप्स: अगर बारिश का मौसम हो: पंखे के नीचे 2 घंटे सुखाएं कपड़े पर 1 चम्मच कॉर्नस्टार्च छिड़कें (एक्स्ट्रा नमी सोखने के लिए) स्टोर करने से पहले: आम के टुकड़ों को हाथ से दबाकर चेक करें – कोई नमी नहीं होनी चाहिए कांच के जार में रखें (प्लास्टिक से बचें) 📹 वीडियो गाइडेंस:हमारे वीडियो के 3:45 मिनट पर देखें – कैसे पहचानें कि आम सही तरह से सूख गया है? (टेक्स्चर टेस्ट डेमो) आम के टुकड़ों से पानी छानते समय एक छलनी का उपयोग करता हुआ व्यक्ति। स्टेप 4: मसालों को भूनने और तेल तैयार करने की विशेषज्ञ विधि (स्वाद और सुगंध को परफेक्ट बनाने के लिए) 🌿 मसालों को भूनने का सही तरीका 1. मेथी दाना (सबसे पहले भूनें) 2 बड़े चम्मच मेथी को सूखे पैन में डालें धीमी आंच पर भूनें (हिलाते रहें) रंग: हल्का भूरा होने तक (कड़वाहट दूर करने के लिए) सावधानी: ज्यादा भूनने से कड़वा हो सकता है 2. सरसों व अन्य मसाले ½ कप पीली सरसों + धनिया बीज + जीरा + सौंफ एक साथ भूनें आदर्श रंग: सुनहरा-भूरा (सरसों चटकने लगे तब तक) प्रो टिप: मसालों को कपड़े पर फैलाकर ठंडा करें (भाप से नमी नहीं) 3. कलौंजी (प्याज के बीज) इसे न भूनें (कच्चा ही डालें – स्वाद बरकरार रखने के लिए) 🔥 तेल तैयार करने की विशेष विधि ½ कप सरसों तेल को पैन में गर्म करें धुआं आने तक गर्म करें (लेकिन जलने न दें) पूरी तरह ठंडा होने दें (गुनगुना होने पर ही अचार में मिलाएं) टेस्ट: ठंडे तेल में 1 चम्मच मसाला मिलाकर चेक करें (तेल अलग नहीं होना चाहिए) 🧂 मसाला मिक्सचर बनाने की स्टेप-बाय-स्टेप विधि भुने मसालों को दरदरा पीसें (बहुत बारीक नहीं) एक बड़े कटोरे में मिलाएं: पिसे मसाले 1 चम्मच हींग (असली) 1 चम्मच लाल मिर्च पाउडर (कश्मीरी मिर्च बेहतर) 1 चम्मच हल्दी 2 चम्मच काला नमक 3 बड़े चम्मच सफेद नमक कलौंजी को अंत में मिलाएं (पीसें नहीं) मिक्सिंग टिप: हाथों से मिलाएं (चम्मच से नहीं) ⚠️ महत्वपूर्ण चेतावनियाँ तेल ज्यादा गर्म न हो – मसालों का रंग खराब हो सकता है मसाले पीसते समय मिक्सी को बीच-बीच में रोकें (ज्यादा गर्म होने से बचाएं) हींग हमेशा अंत में डालें (गर्म तेल में इसकी खुशबू बरकरार रहती है) 🎥 वीडियो गाइड:हमारे वीडियो के 5:20 मिनट पर देखें – कैसे पहचानें कि मसाले सही तरह से भुन गए हैं? (रंग और खुशबू के संकेत) मसालों को ध्यानपूर्वक भूना जा रहा है, जिससे एक स्वादिष्ट व्यंजन तैयार हो रहा है। स्टेप 5: अचार को मिलाने और मैच्योर करने की विशेषज्ञ विधि (क्रंची टेक्स्चर और लंबी शेल्फ लाइफ के लिए) 🥣 मिक्सिंग की परफेक्ट टेक्नीक आम + सिरका मिलाएं ½ कप सेब का सिरका (या सफेद सिरका) डालें हाथों से मिलाएं (दस्ताने पहनकर) – 2 मिनट तक प्रभाव: सिरका आम को कुरकुरा बनाता है और pH संतुलित करता है मसाला मिक्सचर डालें मसालों को थोड़ा-थोड़ा डालें हर परत को अच्छी तरह मिलाएं (कोई सूखा मसाला न दिखे) तेल की आखिरी लेयर ठंडा किया हुआ सरसों तेल डालें फोल्डिंग मोशन से मिलाएं (चम्मच से नहीं) 🌞 मैच्योरेशन प्रोसेस (2 चरणों में) चरण 1: प्रारंभिक फरमेंटेशन (2 दिन) कांच के बाउल में रखें क्लिंग रैप से ढकें (हवा बिल्कुल न लगने दें) रखने का स्थान: गर्मियों में: धूप में 4 घंटे/दिन सर्दियों में: किचन काउंटर पर चरण 2: फाइनल एजिंग (15 दिन) एयरटाइट जार में ट्रांसफर करें तेल की लेयरिंग: पहले जार के तले में 2 बड़े चम्मच तेल अचार डालें ऊपर से तेल की 1cm मोटी लेयर (सभी टुकड़े डूबे हों) धूप एक्सपोजर: पहले 7 दिन: रोज 2 घंटे धूप अगले 8 दिन: कमरे के तापमान पर ⚠️ महत्वपूर्ण सावधानियाँ हर 3 दिन में जार हिलाएं (मसाले समान रूप से मिलें) तेल की लेयर चेक करें – अगर कम हो तो और डालें फफूंद लगने पर: प्रभावित हिस्सा हटा दें 1 बड़ा चम्मच नींबू का रस मिलाएं 🍽️ सर्विंग टिप्स पहली बार इस्तेमाल: 15 दिन बाद ही करें सर्व करने से पहले: जार से निकालकर 10 मिनट धूप में रखें (खुशबू बढ़ाने के लिए) टेक्स्चर चेक: आम का टुकड़ा कुरकुरा होना चाहिए, नर्म नहीं 📹 वीडियो गाइड:हमारे वीडियो के 7:30 मिनट पर देखें – कैसे पहचानें कि अचार पूरी तरह तैयार है? (रंग, खुशबू और टेक्स्चर टेस्ट) प्रो टिप:अचार को नीम के पत्ते के ऊपर रखें – प्रिजर्वेशन बढ़ जाता है! क्या आपको अचार के साथ परोसने के लिए स्पेशल पराठे/चावल रेसिपी चाहिए? 😊 #SookhaAamAchar #DryMangoPickle #HealthyPickle #NoOilPickle #HomemadePickle #IndianFoodBlogger #MangoLovers #SummerSpecial #PickleIn15Days #GrandmasRecipe #ZeroPreservatives #FoodieFavorites #MonsoonRecipes #RainyDayFood #ComfortFood #foodzlife प्लास्टिक से ढका हुआ स्वादिष्ट आम का अचार का कटोरा।

1 कटोरी चावल, 3 देशों का स्वाद: चाइनीस फ्राइड राइस, इटैलियन रिसोट्टो और इंडियन टमाटर राइस – 20 मिनट में तैयार
आज हम 1 कटोरी चावल से 3 अलग-अलग देशों की डिश बना रहे हैं. 1 कटोरी चावल, 3 देशों का स्वाद! 🌍🍚 चाइनीस फ्राइड राइस 🥢 | इटैलियन रिसोट्टो 🧀 | देसी टमाटर राइस 🍅कमाल की रेसिपीज जो आपकी रसोई को बना देंगी मिनी वर्ल्ड किचन! 🌏 रेसिपी 1: चाइनीस फ्राइड राइस वेज हो या नॉन-वेज, ये फ्राइड राइस हर किसी को बना देगा फैन! 😋👌 #ChineseMagic सामग्री: 1 कटोरी उबले चावल (ठंडे) 1/2 कप मिक्स वेजीज (गाजर, बीन्स, शिमला मिर्च) 1 अंडा (ऑप्शनल) 1 छोटा चम्मच सोया सॉस 1/2 छोटा चम्मच विनेगर 1 हरी मिर्च (कटी हुई) स्वादानुसार नमक और काली मिर्च बनाने की विधि: कड़ाही में 1 बड़ा चम्मच तेल गर्म करें, हरी मिर्च और अंडा डालकर स्क्रैम्बल करें। सभी सब्जियाँ डालकर 2 मिनट भूनें। चावल, सोया सॉस, विनेगर, नमक-मिर्च डालकर अच्छी तरह मिलाएँ। गार्निशिंग के लिए स्प्रिंग ऑनियन डालें। रेसिपी 2: इटैलियन रिसोट्टो (घर का बना वर्जन) इटली का मशहूर रिसोट्टो, अब घर पर बनाएं – बिना पासपोर्ट के! 🧀🇮🇹 #CreamyRisotto सामग्री: 1 कटोरी उबले चावल 1/2 कप प्याज़ (बारीक कटी) 1/4 कप मशरूम/पालक 1 बड़ा चम्मच बटर 1/2 कप दूध/वेजिटेबल स्टॉक 1 छोटा चम्मच ऑरिगैनो 2 बड़े चम्मच चीज़ (पार्मेजान या प्रोसेस्ड) बनाने की विधि: पैन में बटर पिघलाकर प्याज़ और मशरूम भूनें। चावल डालकर 1 मिनट भूनें, फिर दूध/स्टॉक डालें। ऑरिगैनो और चीज़ मिलाकर गाढ़ा होने तक पकाएँ। गार्मिश के लिए बेसिल लीव्स डालें। रेसिपी 3: इंडियन टमाटर राइस टमाटर राइस - सादा पर इतना स्वादिष्ट कि प्लेट साफ हो जाए! 😋👌 सामग्री: 1 कटोरी उबले चावल 2 टमाटर (प्यूरी बनाएँ) 1 छोटा चम्मच राई 1/2 छोटा चम्मच हल्दी 1 छोटा चम्मच गरम मसाला कुछ करी पत्ते बनाने की विधि: कड़ाही में तेल गर्म करके राई और करी पत्ता डालें। टमाटर प्यूरी, हल्दी, नमक डालकर पकाएँ जब तक तेल अलग न हो जाए। चावल और गरम मसाला मिलाएँ। गार्निशिंग के लिए धनिया पत्ती डालें। 📌 विशेष टिप्स: चाइनीस राइस: चावल ठंडे होने चाहिए वरना चिपक जाएँगे। रिसोट्टो: दूध धीरे-धीरे डालें, लगातार चलाते रहें। टमाटर राइस: तेल अच्छा गर्म होना चाहिए ताकि राई अच्छे से फटे।ये सभी रेसिपीज कम सामग्री और कम समय में बनकर तैयार हो जाती हैं। #1कटोरी3स्वाद #चावलविशेष #20मिनटमेंतैयार #GlobalRiceRecipes #ChineseFriedRice #ItalianRisotto #IndianTomatoRice #FoodzLifeSpecial #RecipeOfTheDay

1 कटोरी दही से 3 जबरदस्त रेसिपी – Breakfast To Dessert!(घर की दही से बनेंगी स्वादिष्ट, हेल्दी और आसान डिशेज)
दही सिर्फ रायते तक सीमित नहीं! 😍 जानिए 1 कटोरी दही से बनने वाली 3 जबरदस्त रेसिपीज – नाश्ते से लेकर डेजर्ट तक! 🍽️✨ फटाफट, हेल्दी और इतनी आसान कि बच्चे भी बना लेंगे दही सिर्फ रायते तक सीमित नहीं! 😍 1 कटोरी दही से बनाएं 3 जबरदस्त डिश - हेल्दी ब्रेकफास्ट से लेकर रॉयल डेजर्ट तक! 🍽️✨ #दहीरेसिपी #FoodzLife 🍽️ रेसिपी 1: दही चावल बनाने की आसान विधि - साउथ इंडियन स्टाइल में ठंडा और ताज़ा स्वाद गर्मियों की चिलचिलाती धूप में ठंडा, ताज़ा और पौष्टिक दही चावल से बेहतर कुछ नहीं! 😌🍚 यह साउथ इंडियन स्टाइल दही चावल न सिर्फ पेट को ठंडक देता है बल्कि पाचन भी दुरुस्त करता है। आज हम आपको सिखाएंगे 5 मिनट में बनने वाली यह आसान रेसिपी जिसे आप नाश्ते या लंच में खा सकते हैं 📝 सामग्री (Ingredients List – SEO Friendly) 🌿 मुख्य सामग्री: 1 कटोरी ताज़ा दही (घर का बना या गाढ़ा दही) ½ कप उबले हुए चावल (बासमती या सामान्य) ½ छोटा चम्मच राई (सरसों के दाने) 1 हरी मिर्च (बारीक कटी हुई) 8-10 करी पत्ते (ताज़े या सूखे) स्वादानुसार नमक ✨ ऑप्शनल गार्निशिंग: भुना हुआ जीरा पाउडर कटा हरा धनिया कद्दूकस किया हुआ नारियल 👩🍳 बनाने की विधि (Step-by-Step Method – SEO Optimized) 1. दही और चावल को मिलाएं एक बड़े बाउल में दही और उबले हुए चावल डालें। अच्छी तरह मिलाएं ताकि चावल दही में अच्छे से कवर हो जाएं। नमक डालकर फिर से मिक्स करें। 2. तड़का तैयार करें एक छोटी कड़ाही में 1 चम्मच तेल गर्म करें। राई डालें और चटकने दें। हरी मिर्च और करी पत्ता डालकर हल्का सा भूनें। 3. तड़का दही चावल में मिलाएं तैयार तड़का दही-चावल के मिश्रण में डालें। हल्के हाथों से मिलाएं ताकि सभी फ्लेवर्स एकसमान रूप से फैल जाएं। 4. गार्निश करें और सर्व करें ऊपर से भुना जीरा पाउडर, कटा हरा धनिया और नारियल डालें। ठंडा परोसें या फ्रिज में 10 मिनट रखकर ठंडा करें। #दहीचावल #साउथइंडियनफूड #गर्मीकीरेसिपी #FoodzLife #QuickRecipe #HealthyEating #NoCookingRecipe 🥒 रेसिपी 2: ककड़ी-पुदीना रायता रेसिपी – गर्मियों के लिए परफेक्ट ठंडी और हेल्दी साइड डिश गर्मियों की चिलचिलाती धूप में ठंडा और ताज़ा ककड़ी-पुदीना रायता से बेहतर कुछ नहीं! 😌🥒 यह रायता न सिर्फ स्वाद में बेहतरीन है बल्कि पेट को ठंडक भी देता है। आज हम आपको सिखाएंगे 5 मिनट में बनने वाली यह आसान रेसिपी जिसे आप लंच या डिनर के साथ परोस सकते हैं! 📝 सामग्री (Ingredients List ) 🌿 मुख्य सामग्री: 1 कटोरी ताज़ा दही (घर का बना या गाढ़ा दही) ½ कप ककड़ी (कद्दूकस की हुई) 1 छोटा चम्मच भुना जीरा पाउडर ¼ छोटा चम्मच लाल मिर्च पाउडर 2 बड़े चम्मच पुदीना (बारीक कटा हुआ) स्वादानुसार नमक ✨ ऑप्शनल गार्निशिंग: ताज़ा पुदीना की पत्तियाँ कटा हरा धनिया भुना हुआ जीरा 👩🍳 बनाने की विधि (Step-by-Step Method) 1. दही को फेंट लें एक बड़े बाउल में दही डालें और अच्छी तरह फेंट लें ताकि यह चिकना हो जाए। 2. सभी सामग्री मिलाएं इसमें कद्दूकस की हुई ककड़ी, कटा हुआ पुदीना, भुना जीरा पाउडर और नमक डालें। सभी चीजों को अच्छी तरह मिलाएं। 3. गार्निश करें ऊपर से लाल मिर्च पाउडर और ताज़ा पुदीना की पत्तियों से सजाएं। 4. सर्व करें रायता को ठंडा परोसें या फ्रिज में 10 मिनट रखकर ठंडा करें। #ककड़ीरायता #पुदीनारायता #गर्मीकीरेसिपी #FoodzLife #QuickRecipe #HealthyEating #NoCookingRecipe 🍨 रेसिपी 3: इंस्टेंट श्रीखंड बनाने की विधि - 30 मिनट में तैयार मलाईदार मीठा डेजर्ट महज 3 सामग्रियों से बनने वाला यह शाही श्रीखंड आपके मेहमानों को हैरान कर देगा! 😍🍨 जानिए कैसे बनाएं बिना मेहनत के यह मलाईदार मराठी डेजर्ट, जो गर्मियों में ठंडक देने के साथ स्वाद में भी बेमिसाल है 📝 सामग्री 🌿 मुख्य सामग्री: 1 कटोरी मलाईदार दही (होममेड या ग्रीक योगर्ट) 2 बड़े चम्मच पिसी चीनी/मिश्री/शहद ¼ छोटा चम्मच इलायची पाउडर 4-5 केसर के धागे (1 चम्मच गरम दूध में भिगोए हुए) ✨ गार्निशिंग: बारीक कटे बादाम-पिस्ता केसर की बूंदें ताज़े फल (ऑप्शनल) 👩🍳 बनाने की विधि (स्टेप बाय स्टेप) 1. दही को स्ट्रेन करें मलमल के कपड़े में दही डालकर 30 मिनट लटकाएं (पानी निकल जाएगा)। 2. श्रीखंड तैयार करें स्ट्रेन की हुई दही में चीनी, इलायची पाउडर और केसर मिलाएं। 5 मिनट तक फेंटें जब तक क्रीमी टेक्स्चर न आ जाए। 3. सर्व करें कटोरी में निकालकर 1 घंटे फ्रिज में ठंडा करें। ऊपर से ड्राई फ्रूट्स और केसर से गार्निश करें। 📌 विशेष टिप्स: दही चावल बनाते समय दही फ्रेश होनी चाहिए (खट्टी नहीं)। रायता को गाढ़ा रखने के लिए ककड़ी का पानी निचोड़ें। श्रीखंड के लिए हंग कर्ड (ग्रीक योगर्ट) यूज़ करेंगे तो और क्रीमी बनेगा। #श्रीखंड #दहीडेजर्ट #मराठीफूड #FoodzLife #QuickDessert #IndianSweets #NoBakeRecipe

1 मिनट में बनाएं साबूदाना पॉपकॉर्न फ्राइम्स | Sabudana Popcorn Fryums Recipe Without Soaking
मुंह में रखते ही घुल जाने वाले, हल्के और सुपर क्रिस्प साबूदाना पॉपकॉर्न फ्राइम्स अब घर पर बनाना बेहद आसान है। इस रेसिपी में न साबूदाना भिगोना है, न सोडा और न ही पापड़ खार — फिर भी फ्राइम्स बहुत अच्छे से फूलते हैं और साल भर स्टोर किए जा सकते हैं। घर पर बनाएं हल्के, कुरकुरे और मुंह में घुल जाने वाले साबूदाना पॉपकॉर्न फ्राइम्स — बिना भिगोए, बिना सोडा 🧂 Ingredients (सामग्री) साबूदाना – 1½ कप (लगभग 280 ग्राम) कच्चा आलू – 1 बड़ा (150–200 ग्राम) पानी – लगभग 10 कप नमक – स्वाद अनुसार फूड कलर (ऑप्शनल) सेंधा नमक (व्रत के लिए) 👩🍳 Step-by-Step Method Step 1: साबूदाना पीसें साबूदाने को कपड़े से साफ करके मिक्सर में पीसकर बारीक पाउडर बना लें। Step 2: आलू तैयार करें आलू छीलकर छोटे टुकड़ों में काटें, स्टार्च हटाने के लिए धो लें और थोड़ा पानी डालकर पीस लें। Step 3: बैटर बनाएं साबूदाना पाउडर + आलू पेस्ट मिलाकर पानी डालते हुए पतला बैटर बनाएं। Step 4: बैटर पकाएं (Important Step) बैटर को कढ़ाही में डालकर लगातार चलाते हुए 25–30 मिनट पकाएं जब तक बैटर ग्लॉसी और शाइनी न हो जाए। Step 5: 10 मिनट रेस्ट दें ढककर 10 मिनट रखें — इससे परफेक्ट टेक्सचर मिलेगा। Step 6: कलरफुल फ्राइम्स (Optional) बैटर को 2–3 हिस्सों में बांटकर फूड कलर मिला सकते हैं। Step 7: पॉपकॉर्न ड्रॉप्स बनाएं बैटर को पॉलिथीन/जिप लॉक में भरकर प्लास्टिक शीट पर छोटे-छोटे ड्रॉप्स बनाएं। Step 8: सुखाएं 1–2 दिन धूप या पंखे की हवा में सुखाएं। 🍳 Frying Method गरम तेल में फ्राइम्स डालते ही 3–4 गुना फूल जाते हैं और मुंह में रखते ही घुल जाते हैं। 🫙 Storage Tips पूरी तरह सूखने के बाद एयर-टाइट जार में रखें 1 साल तक स्टोर कर सकते हैं बीच-बीच में धूप दिखाएं ⭐ Recipe Highlights ✔ बिना भिगोए साबूदाना✔ बिना सोडा, बिना पापड़ खार✔ व्रत के लिए भी परफेक्ट✔ साल भर स्टोरेज✔ सुपर क्रिस्प और लाइट #sabudanapopcornfryums #sabudanafryums #sabudanapapad #vratsnacks #sagofryums #fryumsrecipe #homemadefryums #indiansnacks #fastingrecipe #sabudanasnacks #crispyfryums #papadfryums #snackrecipe #easyrecipe #foodzlife #traditionalrecipe #glutenfreesnack #holisnacks #navratrispecial #trendingrecipe 1 मिनट में बनाएं क्रिस्पी साबूदाना पॉपकॉर्न फ्राइम्स — बिना भिगोए, बिना सोडा, परफेक्ट व्रत स्नैक जो तलते ही 3–4 गुना फूलता है

1 मिनट में बनाये 25 से 30 चावल के पापड़ एक नई विधि से | Chawal ke Papad | Rice Papad Recipe
पापड़ हमारे खाने का एक अहम् हिस्सा होता है . अगर खाने के साथ पापड़ मिल जाये तो खाने का स्वाद दोगुना हो जाता है .पापड़ कई तरह के होते है जैसेकि - सूजी के पापड़ , अरारोट के पापड़, गेंहू के पापड़ , दाल के पापड़ , मैदे के पापड़ , बेसन के पापड़ , चावल के पापड़ आदि . आज मै आपके लिए चावल के पापड़ की आसान विधि लेकर आई हू. इस विधि से आप आसानी से चावल के पापड़ बना सकते हैं . अगर सही विधि पता हो तो चावल के पापड़ बनाना बहुत ही आसान है और इसे बनाने में समय भी कम लगता है . ये पापड़ आप लम्बे समय तक के लिए बनाकर रख सकते है और जब भी मन करे तेल में तलकर खा सकते है . चावल के पापड़ बनाने की ये परफेक्ट रेसिपी है आप इस रेसिपी को एक बार जरुर ट्राई करे . आवश्यक सामग्री 125 ग्राम (1/2 कप ) कच्चे चावल 95 ml पानी 1/4 टीएसपी नमक 20 करी पत्ते 2 हरी मिर्च 5 ग्राम मैदा बनाने की विधि Step 1 125 ग्राम (1/2 कप ) कच्चे चावल अच्छे से धुलकर रात भर के लिए भिगोकर रख दे चावल को पानी से निकालकर मिक्सी के जार में 1/2 कप चावल और 1/4 कप पानी डालकर पीस लें . यहाँ पर ध्यान रखें कि जितने चावल है पानी उसका आधा लेना है . मिक्सी में पल्स मूड पर चिकना और बारीक पीसना है एक बाउल में छन्नी से छान ले 5 ग्राम मैदा मिला दें अच्छे से मिक्स कर लें 20 करी पत्ते बारीक काटकर मिला दें 2 हरी मिर्च पतली काटकर मिला दें 1/4 टीएसपी नमक मिला दें , अच्छे से मिक्स कर लें चम्मच की मदद से घोल को चेक कर लें Step 2 पापड़ बनाने के लिए आप टिफ़िन के ढक्कन , कटोरी आदि ले सकते हैं आधा चम्मच घोल ढक्कन या कटोरी में डालकर फैला लें कडाही या इडली बनाने का सांचा लेकर उसमे जितने ढक्कन या कटोरी आ सके रख दे . उपर से ढक दे मध्यम आंच पर 1 मिनट के लिए पका ले पानी का एक बड़ा बाउल लेकर उसमे पापड़ डेमौल्ड कर लें सिर्फ 10 सेकंड के लिए ढक्कन या कटोरी को पानी के बाउल में डालकर निकाल लें चाक़ू या चम्मच के पिछले हिस्से से पापड को निकाल लें प्लास्टिक शीट या पतले कपडे पर फैला दें धूप में या पंखे की हवा में सुखा लें , बीच - बीच में पलटते रहें 4 से 5 घंटे में पापड़ सूखकर खाने के लिए तैयार हो जाते हैं Step 3 पापड़ तलने के लिए एक कडाही में तेल अच्छे से गरम करें , गैस की आंच धीमी कर दें कलछी से दबाते हुए पापड तल लें पापड खाने के लिए तैयार हैं . अगर रेसिपी पसंद आये तो लाइक , शेयर और कमेंट जरुर करें . आप रेसिपी का विडियो हमारे youtube चैनल foodzlife पर देख सकते है . हैशटैग #papadrecipe #papad #chawalkepapad #ricepapad #foodzliferecipe

10 साल तक चलेगा यह सूखा आम का अचार! 5 किलो आम के लिए बेस्ट मसाला रेसिपी | बिना प्रिजर्वेटिव, कम तेल
दोस्तों, क्या आप भी ऐसा आम का अचार ढूंढ रहे हैं जो सालों तक खराब न हो और बिना ज्यादा तेल के बने? तो आज हम लेकर आए हैं "10 साल तक टिकने वाला सूखा आम अचार", जिसमें सिर्फ 2 चम्मच तेल लगता है और यह बिना किसी प्रिजर्वेटिव के लंबे समय तक फ्रेश रहता है! साथ ही, हम आपको 5 किलो आम के लिए परफेक्ट अचार मसाला बनाने की सीक्रेट रेसिपी भी बताएंगे। यह अचार स्वाद में तीखा-मीठा और क्रंची होगा, जो आपकी रोटी, पराठे और दाल-चावल के स्वाद को दोगुना कर देगा। दादी के नुस्खे वाला सूखा आम का अचार! 🥭🔥 10 साल तक फ्रेश रखने की राज़ की विधि - बिना प्रिजर्वेटिव, कम तेल, परफेक्ट क्रंच! #सूखाआमअचार #होममेडपिकल सामग्री (5 किलो आम के लिए): मुख्य सामग्री: 5 किलो कच्चे आम (राजापुरी या हापुस) 2 बड़े चम्मच नमक (सुखाने के लिए) 1 छोटी चम्मच हल्दी पाउडर अचार मसाला: 7 बड़े चम्मच सौंफ (40 ग्राम) 5 बड़े चम्मच पीली सरसों (35 ग्राम) 1 बड़ा चम्मच मेथी दाना 1 छोटी चम्मच कलौंजी 1 छोटी चम्मच अजवाइन 1 छोटी चम्मच साबुत काली मिर्च 4-5 साबुत लाल मिर्च (तीखी) 2 बड़े चम्मच काला नमक 4-5 बड़े चम्मच साधारण नमक (स्वादानुसार) 1 बड़ा चम्मच हल्दी पाउडर 5 बड़े चम्मच मिर्ची पाउडर (थ्री मैंगो या सामान्य) 2 बड़े चम्मच राई दाल (वैकल्पिक) अन्य सामग्री: 2 बड़े चम्मच सरसों का तेल (गर्म और ठंडा किया हुआ) कॉटन का कपड़ा (सुखाने के लिए) साफ और स्टेरिलाइज्ड कांच का जार ½ छोटी चम्मच हींग बनाने की विधि (Step-by-Step Recipe): 1. आम को तैयार करना: आमों को अच्छी तरह धोकर सुखा लें। छोटे-छोटे टुकड़ों में काट लें (बीज निकाल दें)। एक बड़े बर्तन में आम के टुकड़ों में 2 बड़े चम्मच नमक + 1 छोटी चम्मच हल्दी मिलाकर 24 घंटे ढककर रख दें। 2. आम को सुखाना: अगले दिन, आम से निकले पानी को अलग बर्तन में स्टोर कर लें (बाद में काम आएगा)। आम के टुकड़ों को कॉटन के कपड़े पर फैलाकर 2-3 दिन धूप में सुखाएं (या पूरी तरह सूख जाने तक)। 3. अचार मसाला तैयार करना: एक पैन में सौंफ, सरसों, मेथी, कलौंजी, अजवाइन, काली मिर्च और लाल मिर्च को भूनें। ठंडा होने पर इसे दरदरा पीस लें। अब इसमें काला नमक, साधारण नमक, हल्दी, मिर्च पाउडर और राई दाल मिलाएं। 4. अचार बनाना: सूखे आम में मसाला मिलाएं और स्टोर किया हुआ पानी डालकर अच्छी तरह मिक्स करें। 2 बड़े चम्मच सरसों के तेल को गर्म करके ठंडा करें और अचार में मिलाएं। अचार को साफ कांच के जार में भरकर 3 दिन तक धूप दिखाएं (रोजाना हिलाते रहें)। 5. सर्विंग और स्टोरेज: 3-4 दिन बाद अचार खाने के लिए तैयार हो जाएगा। इसे एयरटाइट जार में रखें और 10 साल तक चलेगा (बिना खराब हुए)! विशेष टिप्स: ✅ आम का चयन: ताजे, कच्चे और बिना दाग वाले आम लें। ✅ तेल की मात्रा: सिर्फ 2 चम्मच तेल से अचार लंबे समय तक सुरक्षित रहेगा। ✅ मसाला अनुपात: 5 किलो आम के लिए परफेक्ट है। ग्रेवी वाले अचार के लिए 2.5-3 किलो आम काफी है। यह सूखा आम अचार न सिर्फ स्वादिष्ट है, बल्कि बिना प्रिजर्वेटिव और कम तेल में बनाया गया है। इसे बनाकर आप सालों तक इसका मजा ले सकते हैं! अगर आपको यह रेसिपी पसंद आई तो इसे शेयर जरूर करें और हमारी वेबसाइट FoodzLife.com पर विजिट करें। 😊 #AamKaAchar #DryMangoPickle #PickleRecipe #LongLastingPickle #HomemadePickle #IndianPickle #FoodzLife इस रेसिपी का वीडियो लिंक - 10 साल तक चलेगा यह सूखा आम का अचार
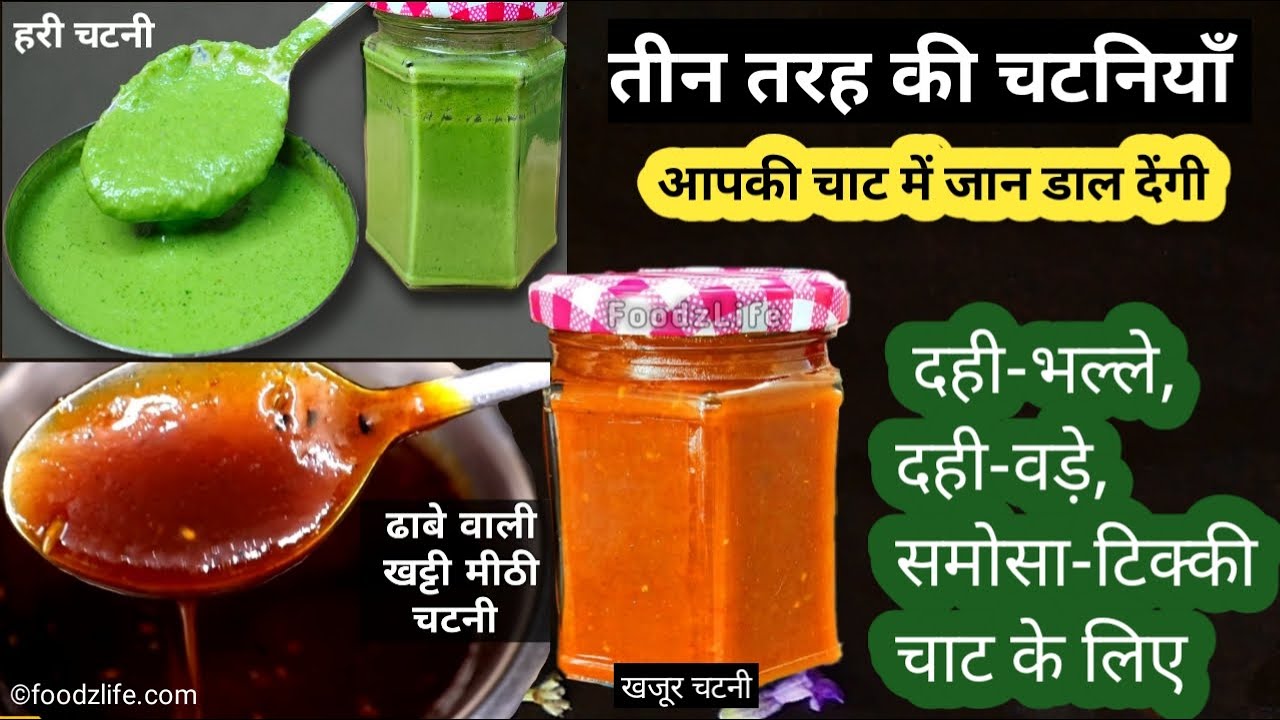
3 ज़बरदस्त चटनियाँ जो हर स्ट्रीट फूड का स्वाद बढ़ा दें – हरी धनिया, खजूर और सोंठ चटनी रेसिपी
अगर आपको भी चाट, दही भल्ले, पानीपुरी या समोसे जैसी स्ट्रीट फूड चीज़ें पसंद हैं, तो ये 3 ज़बरदस्त चटनियाँ आपके खाने का मज़ा दोगुना कर देंगी। हरी धनिया-पुदीना की ताज़गी भरी तीखी चटनी, खजूर की मिठास से भरपूर खट्टी-मीठी चटनी और सौंठ-इमली की मसालेदार पारंपरिक चटनी – ये तीनों स्वाद, रंग और खुशबू में कमाल की हैं। स्वाद ऐसा कि बार-बार बनाएं – हरी, खजूर और सौंठ की लाजवाब चटनियाँ! इन चटनियों को बनाना जितना आसान है, उतना ही इनका स्वाद आपकी हर रेसिपी को बना देगा रेस्टोरेंट स्टाइल। चलिए जानते हैं इन तीनों लाजवाब चटनी रेसिपीज़ को एक-एक करके। 🥇 हरी धनिया पुदीना चटनी (तेज और ताज़गी से भरपूर) यह तीखी और चटपटी हरी चटनी सिर्फ स्वाद ही नहीं, बल्कि खाने का मजा दोगुना कर देती है। इसे आप समोसे, दही भल्ले, आलू टिक्की, चाट, पकौड़े या सैंडविच के साथ परोस सकते हैं। इसकी खास बात यह है कि ये कम सामग्री में झटपट बन जाती है और रंग भी लंबे समय तक हरा बना रहता है। सामग्री: 1 मुट्ठी हरा धनिया (डंठल समेत, धोकर) 10-12 पुदीने के पत्ते 1 बड़ी लहसुन की कली (ऐच्छिक) 5-6 हरी मिर्च (स्वाद अनुसार) 1 इंच अदरक ¼ छोटा चम्मच जीरा नमक स्वाद अनुसार 1 बड़ा नींबू (रस) 1 बड़ा चम्मच ताजा दही (खट्टा नहीं) विधि: मिक्सी के जार में हरा धनिया, पुदीना, अदरक, लहसुन, हरी मिर्च डालें। इसमें जीरा, नमक, नींबू रस और दही डालें। सारी सामग्री को पीस लें जब तक चिकनी पेस्ट न बन जाए। एयरटाइट जार में स्टोर करें और 5–7 दिन फ्रिज में सुरक्षित रखें। #HariChutney #GreenChutney #PudinaChutney #DhaniyaChutney #ChaatWaliChutney #Foodzlife 🥈 इमली-सौंठ की खट्टी-मीठी चटनी चाट का असली स्वाद तब आता है जब उसके साथ हो ये खट्टी-मीठी इमली और सौंठ वाली चटनी। यह वही चटनी है जो हलवाइयों की चाट में मिलती है – गाढ़ी, मसालेदार और बेहद स्वादिष्ट। सामग्री: 200 ग्राम इमली (2–3 घंटे भिगोई हुई) 3 टेबलस्पून आमचूर पाउडर ½ कप गुड़ ½ कप चीनी 1 टीस्पून भुना जीरा धनिया पाउडर ¼ टीस्पून लाल मिर्च पाउडर ¼ टीस्पून काला नमक + सफेद नमक स्वादानुसार 1 टेबलस्पून सौंठ (सूखी अदरक पाउडर) 1 टेबलस्पून कॉर्नफ्लोर या अरारोट (चटनी गाढ़ा करने के लिए) ¼ टीस्पून कलौंजी ¼ टीस्पून काली मिर्च विधि: भीगी हुई इमली को मसलकर गूदा निकालें और छान लें। उसमें आमचूर, नमक, मसाले, गुड़-चीनी, सोंठ, कलौंजी आदि डालें। धीमी आंच पर पकाएं और गाढ़ा होने पर गैस बंद करें। ठंडा करके एयरटाइट कंटेनर में भरें, फ्रिज में 2 हफ्तों तक चलेगी। #ImliChutney #SonthChutney #KhattiMeethiChutney #ChaatChutney #StreetFoodStyle #Foodzlife 🥉 खजूर की खट्टी-मीठी चटनी खजूर से बनी ये चटपटी चटनी इमली के बिना भी उतनी ही स्वादिष्ट बनती है। इसे आप पानीपुरी, दही भल्ले, समोसे, टिक्की या किसी भी चाट में इस्तेमाल कर सकते हैं। सामग्री: ¾ कप बीजरहित खजूर (धोकर, भिगोए हुए) 2–3 टेबलस्पून आमचूर पाउडर ¾ कप चीनी (या स्वाद अनुसार) 1 टीस्पून जीरा 1 टीस्पून सौंफ 1 टीस्पून सोंठ पाउडर 1 टीस्पून कश्मीरी लाल मिर्च ¼ टीस्पून काली मिर्च नमक स्वाद अनुसार 1 टीस्पून चाट मसाला 1 टेबलस्पून किशमिश 2 टेबलस्पून तेल विधि: खजूर को भिगोकर मिक्सी में पीस लें (थोड़ा पानी डालें)। पैन में तेल गरम करें, जीरा, सौंफ का तड़का लगाएं। खजूर का पेस्ट, मसाले और चीनी मिलाएं। धीमी आंच पर गाढ़ा होने तक पकाएं। ठंडा करके स्टोर करें। यह चटनी 1 महीने तक चलेगी। #KhajoorChutney #DatesChutney #SweetAndTangy #NoImliChutney #ChaatChutney #Foodzlife

5 मिनट में घर पर सिरका बनाएं | Vinegar recipe & Uses | Homemade Sirka Recipe 5 Minutes
यूँ देखा जाये तो सिरके के कई प्रकार हैं , जैसे कि सेब का सिरका, गन्ने का, जामुन का, बल्सेमिक विनेगर, वुडेन विनेगर, चावल का सिरका, माल्ट विनेगर, रेड वाइन विनेगर, वाइट वाइन विनेगर, किशमिस का सिरका, और सफ़ेद सिरका(distilled white vinegar) इत्यादी. और भी तमाम तरह के सिरके बनाये जाते हैं और हमारे एशियाई या अन्य देशों के बाज़ारों में उपलब्ध भी हैं. कुछ सिरके बनाये जाते हैं ताज़े फलों को लम्बे समय तक रख कर प्राकृतिक तरीके से फेर्मेंट कर के और एक प्रक्रिया ऐसी भी होती है जिसके द्वारा आप तुरंत ही सिरका बना सकते हैं जिसको हम आम भाषा में सफ़ेद सिरका या अंग्रेजी भाषा में सिंथेटिक विनेगर के नाम से जानते हैं. white vinegar यानि कि सफ़ेद सिरका यूँ तो चाईनीज़ खाने में सर्वाधिक इस्तेमाल किया जाता है लेकिन क्या आपको पता है कि ये सफ़ेद सिरका आज के समय में अधिकांश रसोइयों में ज़रूर मौजूद मिलेगा. इसका स्वाद खट्टा एवम ये तीव्र गंध वाला होता है, और रंग पारदर्शी. इसका इस्तेमाल विविध चीज़ों में किया जाता है. जैसे की अचार या चटनी की शेल्फ लाइफ बढ़ाने में, अचार या सॉस लम्बे समय तक ख़राब न हो इसके लिए सफ़ेद सिरके की थोड़ी सी मात्रा जोड़ दी जाती है, किसी भी मीठी चीज़ में उसकी मिठास को संतुलित करने में, चायनीज़ खाने जैसे कि चाउमिन, फ्राइड राइस, मंचूरियन, सूप या किसी भी चीज़ को मेरिनेट करने में, और तो और ये सफ़ेद सिरका अपने आप में इतना ज्यादा शक्तिशाली है की इसको सफाई में भी इस्तेमाल किया जाता है, सिरके का इतिहास काफी पुराना है, इसका उपयोग प्राचीन काल से ही चला आया है, आयुर्वेद के ग्रंथों में सिरके का उल्लेख औषधी के रूप में पाया जाता है. बाज़ार में महंगे दामों में मिलने वाला सफेद सिरका बड़ी ही आसानी से बहुत ही कम लागत में सिर्फ 5 मिनट के अंदर आप घर पर ही तैयार कर पायेंगे. तो आइये जान लेते हैं सफ़ेद सिरका बनाने की आसान विधि, इस रेसिपी के अंत में सिरका बनाने की विधि वीडियो के द्वारा भी समझाई गयी है, विडियो के अन्दर सफ़ेद सिरके के अनगिनत इस्तेमाल भी सही माप के साथ दिखाए गएँ हैं, यानी कि किस चीज़ में सिरके की कितनी मात्रा का इस्तेमाल किया जाना चाहिए. आवश्यक सामग्री: 2 कप पानी / 500 ml water(RO water or boiled and completely cool water) २५ मिलिलीटर एसिटिक एसिड / 25 ml acetic acid (glacial brand) काँच का बाउल / glass bowl लकड़ी या प्लास्टिक का चम्मच / wooden or plastic spoon/spatula सिरका स्टोर करने के लिए कांच की बोतल / sterilized glass jar प्लास्टिक की कीप / funnel सिरका बनाने की विधि : सफेद सिरका बनाने के लिए सर्वप्रथम हमको एक कांच का बर्तन और सिरके को चलाने के लिए लकड़ी या प्लास्टिक का चम्मच चाहिए होगा. 1/2 लीटर सफ़ेद सिरका(distilled white vinegar) बनाने के लिए हमको 2 कप पानी यानी कि 500 ml water या आधा लीटर RO का पानी चाहिए होगा, और यदि आर ओ के पानी की सुविधा नहीं है तो आप आधे लीटर पानी को तेज़ गरम कर के खौला लें और उस पानी को पूर्णतया ठंडा होने दें उसके बाद उस पानी को इस्तेमाल में लें. कांच के गहरे बाउल में आधा लीटर पानी शामिल करें, अब उस पानी के अंदर २५ मिलिलीटर(25 ml)
एसिटिक एसिड( glacial का acetic acid) शामिल करें, यदि आप सिर्स सफाई के मकसद से ही सफ़ेद सिरका बना रहे हैं तब उस अवस्था में 2 कप पानी के अन्दर 50 से 60 ml एसिटिक एसिड डालकर सिर्फ और सिर्फ सफाई के लिए ही इस्तेमाल करें . किसी लकड़ी या प्लास्टिक के चम्मच से दोनों ही चीज़ों को आपस में मिला दें. सफेद सिरका तैयार है, सफ़ेद सिरके को और भी ज्यादा असरदार बनाने के लिए आप इसमे 1 ग्राम के करीब टाटरी (citric acid) मिला सकते हैं. लेकिन ये ऑप्शनल है. अब तैयार सिरके को किसी साफ़ सूखी(sterilized) कांच की बोतल में भरकर रखें, बोतल में भरने के लिए किसी प्लास्टिक की कीप को इस्तेमाल में लें और अब तैयार सफेद सिरके को अपनी आवश्यकतानुसार इस्तेमाल में लें. कुछ ध्यान देने योग्य आवश्यक बातें: बाज़ार में मिलने वाले 1 लीटर सफ़ेद सिरके के अन्दर लगभग 5 से 7 प्रतिशत तक एसिटिक एसिड होता है, हमने इसी रेश्यो(ratio) को ध्यान में रखते हुए एस सिरके को तैयार किया है. यदि आप सफ़ेद सिरका साफ़ सफाई में इस्तेमाल करने के लिए बना रहे हैं तब आप पानी के अन्दर एसिटिक एसिड की मात्रा बढ़ा सकते हैं. और एक तीव्र सिरका बना कर तैयार कर सकते हैं. सफ़ेद सिरके से आप हद्द से ज्यादा जले हुए बर्तनों को एकदम नया चमका सकते हो, चाय की गंदी छन्नी साफ़ कर सकते हैं, वुडेन फर्निचर, लैपटॉप कीबोर्ड और स्क्रीन साफ़ कर सकते हो, कांच की सफाई कर सकते हैं और भी तमाम सफ़ाई की जा सकती हैं, हमने नीचे इस लेख के साथ एक विडियो सलंग्न की है उसमे कुछ सफाई के नमूने दिखाए गए हैं, हमने आपको माइल्ड सफ़ेद सिरके की रेसिपी दी है इसको आप सफाई के अलावा खाने की चीज़ों में भी इस्तेमाल कर सकते हैं जैसे कि अचार को लम्बे समय तक संरक्षित करने के लिए, छेना बनाने में, चटनी या सॉस या अचार को संरक्षण के साथ साथ खट्टा स्वाद भी देता है और सिरके वाली प्याज़ बनाने में भी, इनके अलावा आप सिरके से किसी भी चीज़ को मेंरिनेट भी कर सकते हैं और चायनीस खाना तो बिना सिरके के अधूरा है, ध्यान रहे जब भी सिरका तैयार करें अपने नाक और मुह को ढक कर रखें या मास्क पहन कर रखें क्यूंकि एसिटिक एसिड की तीव्र गंध से आपको परेशानी हो सकती है. सिरका बनाने के लिए कभी भी मेटल के बर्तनों का इस्तेमाल न करें वरना क्रिया कर सकता है, सिरका बनाने के लिए या स्टोर करने के लिए हमेशा कांच, प्लास्टिक या मिट्टी के बर्तनों का ही उपयोग करें. सफ़ेद सिरका(distilled white vinegar) बनाने में हमने जो एसिटिक एसिड (acetic acid) का इस्तेमाल किया है यह आपको मेडिकल स्टोर (chemist shop) से मिल जायेगा या फिर आप इसको ऑनलाइन भी मंगवा सकते हैं. ये एसिटिक एसिड 10 रूपये की कीमत से लेकर 150 रूपये की कीमत तक उनकी quantity के अधर पर मिल जायेगा. अगर आप इस विधि को विडियो के ज़रिये देखना चाहते हैं तो नीचे दिए गए विडियो पर नज़र डालें और रेसिपी का आनन्द लें. अगर ऐसे ही और भी विडियो देखना चाहतें हैं तो FoodzLife channel को subscribe कर लें. दोस्तों यदि आपको सफ़ेद सिरका बनाने की आसान विधि पसंद आई है तो लाइक कीजिये और शेयर कीजिये इस रेसिपी को अपने मित्रों और परिवारजनों के साथ. अगर आप रेसिपी को ट्राई काटें हैं तो अपने अनुभव हमारे साथ ज़रूर साझा करें. धन्यवाद HAPPY COOKING